The first thing to do in a migration to Amazon's Virtual Private Cloud is to set up the subnets, routes, gateways, and NAT instances. My intention in this post is to layout the steps and generic principles contained in our VPC setup. The setup that I chose is not perfect for all situations. I assume you know how to operate the AWS console and are familiar with basic EC2 and networking concepts.
VPC Basics
As concisely as I can, I hope to give understanding concerning the VPC terminology and relations. If you are new to AWS VPC, I highly recommend you take the extra 30 seconds to read this section, boring as it may be.
VPCs consist of multiple subnets. Each subnet exists in a single availability zone, and has a set of routing rules and network ACLs. The difference between public and private subnets is the routing rules. Private subnets will be NATed using an instance in a public subnet. Every instance in a public subnet needs an Elastic IP address.
Network ACLs are an additional layer of security on top of security groups. From the AWS console:
Network ACLs are stateless, which means for any given request you want to handle, you must create rules in both directions.
Network interfaces are present in VPC (absent in EC2), and provide a MAC address, a private IP assignment with DHCP, and a persistence to the elastic IP assignments beyond stopping/starting. An instance must have at least one network interface.
Goals
I really have three goals in the setup of the VPC: availability, security, and maintainability. Clearly, there needs to be a balance between the three; the more secure it is, the harder it is to maintain; the more available a service is, the harder it is to secure. I tend to lean more heavily on availability and maintainability, while still trying to make the system fairly secure.
Amazon's cloud is prone to failures, just like any other data center. The infrastructure must have no single points of failure, neither during the transition nor in 1 month from now. Because the cloud tends to go down a single AZ at a time, isolation between zones will go a long way with availability.
Between security groups, network ACLs, and NAT, the VPC should be more secure than the average EC2 setup. I want to take advantage of these things as much as I can without making it inconvenient to maintain.
My main responsibility is to architect solutions and help develop them. I can't dedicate all, or even a good portion, of my time maintaining firewall rules or troubleshooting connectivity issues. I need something that will be pretty secure, but require very little time to build new systems or services.
Design
A picture is worth a thousand words. I assert that a Lucidchart diagram is worth a million.
There are 4 AZs in us-east. For availability, I need to include all AZs in the VPC. Each zone needs a private subnet and a public subnet. Equally dividing the 10.0.0.0/16 into 8 parts gives the subnets in the picture above.
You'll notice that each AZ has its own NAT intsance. This is my attempt to isolate the AZs from eachother. If one fails, it will not affect the internet availability in another zone.
Each NAT instance is a t1.micro, because, while internet access is necessary, high bandwidth is not crucial. Each of them is EBS backed so I can upgrade them if throughput becomes a problem.
There is more setting this thing up than just the pretty diagram. In the next section, I'll give screenshots and how-tos, but you should first understand what you are doing. If my communication has failed to give that understanding to you, leave a comment, and I'll reply.
Walkthrough
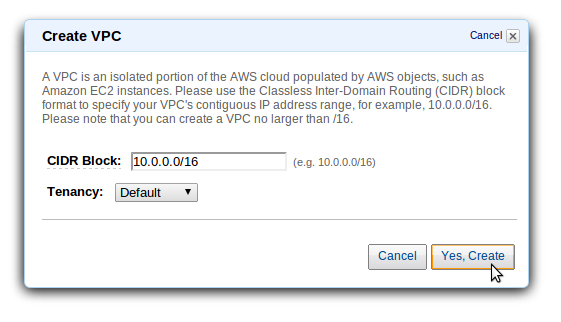
The first step is to create the VPC. Go to the AWS console, select VPC, and create a new one. I am not going to use the wizard for the walkthrough, because it ends up creating more thing than we need.
Now that you have your VPC created, you'll need to create 8 subnets (despite there being only 1 screenshot). This is not the time to differentiate between public and private subnets. The 8 subnets you will create here are listed below.
- us-east-1a 10.0.0.0/19
- us-east-1a 10.0.32.0/19
- us-east-1c 10.0.64.0/19
- us-east-1c 10.0.96.0/19
- us-east-1d 10.0.128.0/19
- us-east-1d 10.0.160.0/19
- us-east-1e 10.0.192.0/19
- us-east-1e 10.0.224.0/19
We need an AWS internet gateway for our public subnets. An internet gateway is nothing more than a routing rule to use the public IP address assigned to the instance. You are only allowed 1 internet gateway, but you must manually create it. I don't know why. It has no options.
All the public subnets will share a single routing table. We'll come back to the private subnets after we have created and configured the NAT instances. Create a single routing table, associate it with all 4 public subnets, and specify the internet gateway as the default route.
Next up is the ACLs. This one is pretty simple because I chose to focus on security groups rather than ACLs. IMHO, it seems that this is the more maintainable approach. We will allow all inbound/outbound traffic all the time.
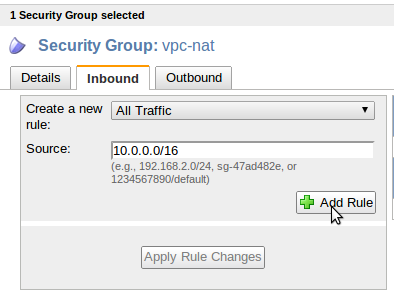
We're going to create a new security group, in the VPC, for our 4 NAT instances. This instance will have a public IP, so you want the group to be as strict as you can make it. We could make 4 different security groups, but I chose to make just 1 that encompassed all 4.
The only rule is to allow all inbound traffic from any of the VPC instances. A majority of this traffic will be just pass-thrus to the internet. The outbound traffic needs to allow all traffic as well, but that should be the default rule.
Let's create the 4 NAT instances from the EC2 tab. The default is to launch them into EC2, but we're going to select one of your new subnets instead. Launch a single t1.micro into each public subnet.
Before you can connect to these instances, you'll need to allocate and assign 4 new elastic IPs (1 per instance). You cannot use an EC2 IP in VPC.
For these instances to NAT traffic, 3 things need to be done.
- Disable the AWS Source/Dest check on the interface. This can be done by right clicking the instance in the EC2 tab of the AWS console.
- Allow forwarding of packets in the kernel. You'll need to be logged into the server for this and the next step. Uncomment the line in /etc/sysctl.conf that looks like this:
;net.ipv4.ip_forward=1
It should now look like this:
net.ipv4.ip_forward=1
Then run
sudo sysctl -p
To verify, run:
[matthew@hunter]$ sudo cat /proc/sys/net/ipv4/ip_forward
The output should be 1 - Change iptables rules to NAT traffic.
Run this command:
sudo iptables -t nat -A POSTROUTING -o eth0 -j MASQUERADE
Now, for the final step, let's circle back and create the private subnet route tables. Each private subnet will have its own routing table. The default route (0.0.0.0/0) for each subnet will be the NAT instance that is in the public subnet of the same availability zone. For example, if the NAT instance i-11111111 is in us-east-1a, then you will create a routing table for the private subnet of us-east-1a with a default route of i-11111111.
After you've created and associated the 4 routing tables for the 4 private subnets, and connected them to the 4 NAT instances (1 each), you're all done! Sit back and play with some Bucky Balls, if you're lucky enough to have some.
Coming Up
My next post will probably be about the VPN. I expected to not use one, but I'm finding that thought a bit short-sighted.


Thanks for taking the time to write up this great series of articles. I noticed one minor issue.
ReplyDeleteIn order to access the NAT machines via SSH, you need to add an Inbound rule on the 'nat' security group policy for TCP port 22.
Thanks a lot . Very clear information about vpc set up without wizard
ReplyDeletewith screenshots .